Experience the intoxicating aroma of sizzling ginger and garlic as they hit the pan to create this stunning Japanese BBQ Chicken Fried Rice. This isn’t just another weekday meal; it is a culinary masterpiece that bridges the gap between high-end hibachi dining and cozy home cooking.
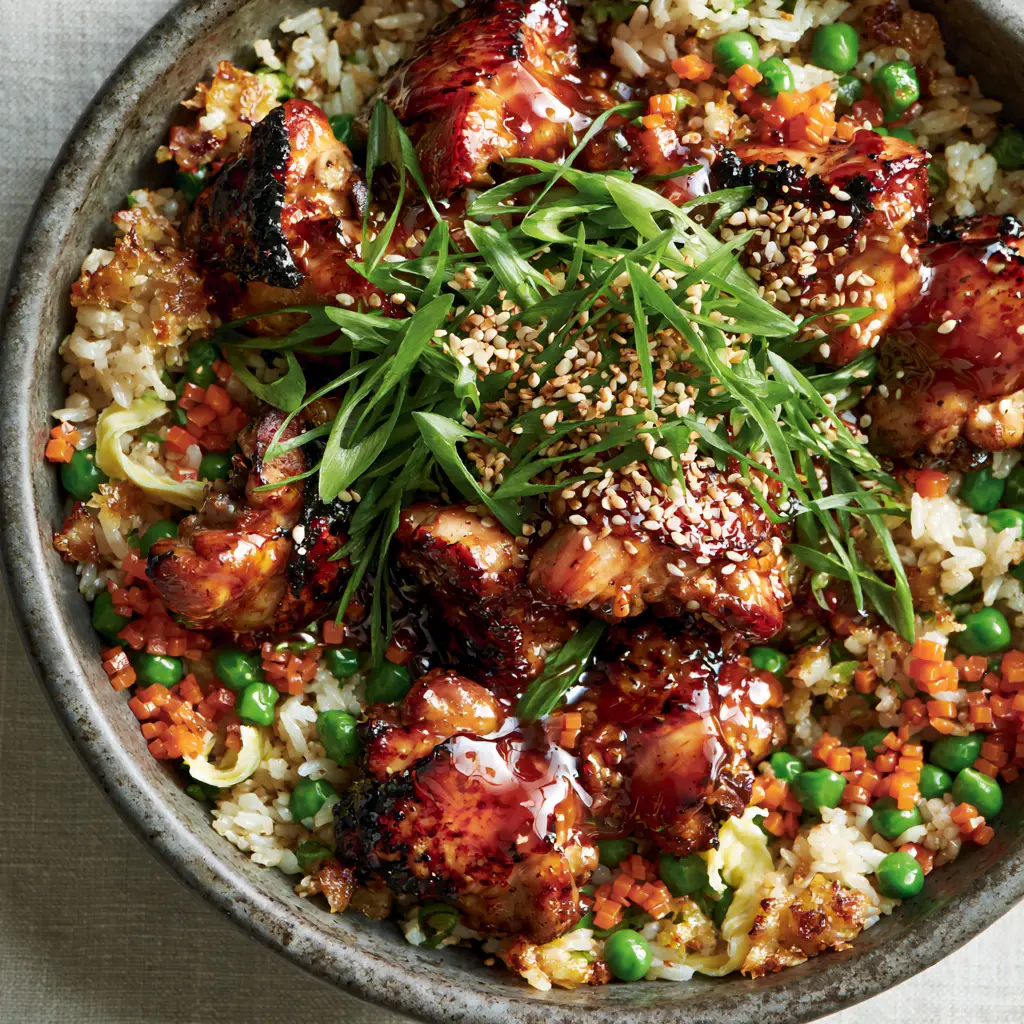
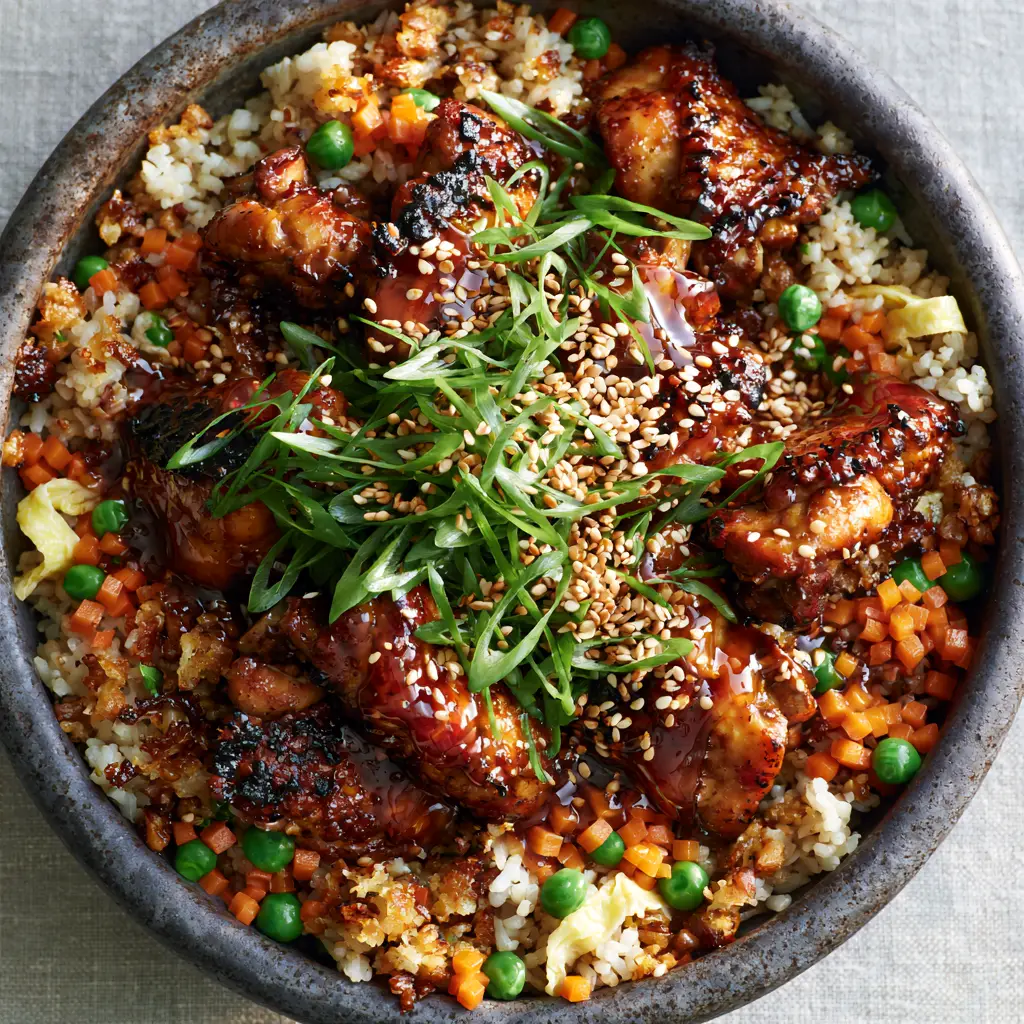
Imagine tender, bite-sized chicken thighs with visible pan-seared char marks, drenched in a thick, translucent, deep mahogany-colored savory umami glaze that glistens under your kitchen lights. The contrast between the smoky charred edges of the chicken and the fluffy, separated grains of short-grain rice creates a textural symphony in every spoonful.
Whether you are looking for a gourmet upgrade to your usual chicken fried rice or you want to master the art of the perfect stir-fry, this recipe delivers professional results. Let’s dive into the science of the perfect sear and the secrets behind that signature mahogany glow.
Why This Japanese BBQ Stir-Fry Outshines Your Local Takeout
- The Mahogany Glaze: A thick, umami-packed sauce that clings to every chicken chunk, providing a sweet and savory finish that rivals any restaurant.
- Perfect Grain Separation: By using specifically prepared short-grain rice, we achieve a fluffy yet chewy texture without any clumping.
- Visual Vibrancy: The pop of bright emerald peas, micro-diced orange carrots, and golden egg ribbons makes this dish as beautiful as it is delicious.
- The Maillard Magic: We focus on high-heat searing to ensure those “charred edges” described in our visual blueprint, adding a deep smokiness to the dish.
The Anatomy of Flavor: Essential Ingredients for Success
Boneless Skinless Chicken Thighs (1.5 lbs / 680g): Unlike breasts, thighs contain enough fat to withstand high-heat searing without drying out. This ensures every piece remains juicy while developing that critical mahogany crust.
Short-Grain White Rice (4 cups / 600g cooked and chilled): Specifically using sushi-style rice provides a unique “bouncy” texture. Ensure it is day-old rice to allow the surface starch to dehydrate, which prevents the dish from becoming mushy.
The “Bachan-Style” BBQ Base (1/2 cup / 120ml): A blend of soy sauce, mirin, sake, and toasted sesame oil forms the backbone of our glaze. This combination creates the translucent, glistening finish seen in the teriyaki chicken fried rice style but with a deeper, smoky BBQ profile.
Micro-Diced Carrots (1/2 cup / 75g) and Sweet Peas (1/2 cup / 75g): Small cuts ensure the vegetables steam perfectly in the residual heat of the rice. Their vibrant colors provide the necessary visual contrast against the dark charcoal ceramic serving bowl.
Aromatic Foundation: Freshly grated ginger (1 tbsp / 15g) and minced garlic (3 cloves) are the “invisible” ingredients that provide the aromatic backbone. They should be sautéed just until fragrant to avoid bitterness.
Finishing Garnishes: A heavy shower of razor-thin scallion rings and toasted white sesame seeds adds the final layer of crunch and freshness. These are not optional if you want to achieve the “extreme close-up” beauty of the professional prompt.
Professional Gear for Wok-Style Results
To achieve the “golden-crisp bits” of rice mentioned in our visual blueprint, you need a vessel that can retain and distribute high heat. A heavy-bottomed carbon steel wok or a large cast-iron skillet is ideal for this Japanese BBQ Chicken Fried Rice.
You will also need a wide metal spatula, often called a “wok hoak,” to toss the ingredients efficiently. This tool allows you to scrape the bottom of the pan to rescue those delicious browned bits (fond) and incorporate them back into the rice.
Step-by-Step Mastery: Building the Ultimate Bowl
The Perfect Pan-Sear: Achieving Charred Edges
Heat 2 tablespoons (30ml) of high-smoke point oil in your pan until it begins to shimmer and a light wisp of smoke appears. Pat your chicken thigh chunks bone-dry with paper towels before adding them to the pan in a single layer.
Resist the urge to move the chicken for at least 3 minutes; this patience allows the sugars and proteins to react, creating those deep mahogany char marks. Once a crust has formed, toss the chicken to sear the remaining sides until fully cooked through.
The Glaze Application: That Glistening Glow
Pour your prepared Japanese BBQ sauce over the seared chicken while the pan is still at medium-high heat. Watch as the sauce begins to bubble and reduce, transforming from a thin liquid into a thick, translucent glaze that coats the meat.
Remove the chicken from the pan and set it aside, leaving the residual glaze and fat in the skillet. This “saucy foundation” is what will flavor and color your rice in the next stage.
Rice and Egg Integration: Fluffy and Golden
Add your chilled rice to the pan, breaking up any large clumps with your spatula. Toss vigorously to ensure every grain is coated in the mahogany residue of the BBQ sauce. Push the rice to the edges to create a “well” in the center.
Pour your beaten eggs into the center, whisking gently until soft, golden ribbons form. Once the eggs are nearly set, fold them into the rice along with your micro-diced carrots and bright green peas. The residual heat will steam the vegetables to a perfect “tender-crisp” state.
The Final Garnish: High-Contrast Visuals
Transfer the rice to a rustic matte charcoal-colored ceramic bowl, as this dark background makes the colors pop. Top with the glazed chicken chunks, ensuring the glistening sauce is visible.
Generously sprinkle the toasted white sesame seeds and the razor-thin scallion rings over the top. The green of the scallions should look “bright and emerald” against the deep brown of the chicken.
Expert Tips for Culinary Forensic Accuracy
- Cold Rice is Mandatory: Freshly cooked rice is too wet and will result in a porridge-like texture. If you’re in a rush, spread fresh rice on a baking sheet and freeze for 20 minutes to “fake” the day-old texture.
- The “Wok Hei” Effect: If using a gas stove, let the flames lick the side of the wok briefly while tossing. This adds a subtle “breath of the wok” smokiness that complements the Japanese BBQ flavor.
- Uniform Veggie Dice: To match the “micro-diced” look, cut your carrots into 1/8-inch cubes. This ensures they cook at the same rate as the peas.
- Balancing Sweet and Salt: If your BBQ sauce is particularly sweet, add a teaspoon (5ml) of rice vinegar at the very end to brighten the flavors.
Storage, Reheating, and Meal Prep
This Japanese BBQ Chicken Fried Rice stores beautifully in the refrigerator for up to 3 days. To reheat, add a splash of water or an extra teaspoon of mirin to the pan to restore the moisture of the glaze.
Avoid the microwave if possible, as it can make the rice rubbery. Instead, a quick 2-minute toss in a hot skillet will revive the “golden-crisp bits” and keep the chicken tender.
What to Pair with Your Japanese BBQ Bowl
To balance the rich, umami-heavy profile of this fried rice, we recommend serving it alongside something bright and acidic. A fresh mango salad or a Thai-style mango salad provides the perfect tropical contrast.
If you want to stick with the noodle theme for a larger feast, consider a side of chilled sesame noodles or even a spicy buldak dish for those who crave a heat kick. For a lighter touch, a peach and feta salad offers a surprising but delightful sweetness that pairs well with the charred chicken.
Frequently Asked Questions
Yes, high-quality brands like Bachan’s work perfectly. If the sauce is thin, simmer it for a few minutes longer to achieve that glistening, mahogany consistency.
The key is high heat and patience. Pat the chicken dry, use an oil with a high smoke point, and let it sear undisturbed for at least 3 minutes before tossing.
It can be! Simply substitute the soy sauce in the glaze for tamari or coconut aminos and ensure your Japanese BBQ sauce is certified gluten-free.
Short-grain white rice, specifically sushi rice, is best. It provides a chewy, bouncy texture that holds up well against the thick BBQ glaze without becoming mushy.
Soggy rice usually comes from using freshly cooked grains or too much liquid. Use day-old, chilled rice to ensure the grains stay separate and fluffy.
Mastering the Japanese BBQ Chicken Fried Rice Recipe
Japanese BBQ Chicken Fried Rice: The Ultimate Umami Stir-Fry Guide
Ingredients
Equipment
Method
- Heat oil in a wok over high heat. Add chicken thighs in a single layer. Sear for 3-4 minutes without moving until deep char marks form and edges are crispy.
- Pour the Japanese BBQ sauce over the chicken. Toss for 1-2 minutes until the sauce reduces into a thick, glistening mahogany glaze. Remove chicken from pan and set aside.
- Add chilled rice to the same pan. Stir-fry for 3-5 minutes, breaking up clumps, until some grains become golden-crisp.
- Push rice to the sides. Pour eggs into the center and scramble into ribbons. Add peas and micro-diced carrots, then fold everything together.
- Return chicken to the pan for a final toss. Serve in a dark ceramic bowl topped with scallion rings and sesame seeds.
Notes
Don't overcrowd the pan when searing the chicken to ensure a proper char.
Closing & Call to Action
Creating this Japanese BBQ Chicken Fried Rice is a journey into the heart of umami. From the first sear of the chicken to the final sprinkle of sesame seeds, every step is designed to create a visual and flavorful masterpiece that you’ll want to make again and again.
If you loved this recipe, please leave a comment below and tell us how your mahogany glaze turned out! Don’t forget to follow us on Pinterest for more culinary inspiration and high-RPM recipes. Share your creations by tagging @KellyTaste—we can’t wait to see your charred chicken edges!