There is something undeniably nostalgic about the scent of a campfire, but you don’t need a tent or a fire pit to experience that magic. These s’mores blossom cookies capture every sensory detail of a lakeside summer night, condensed into a single, handheld masterpiece.
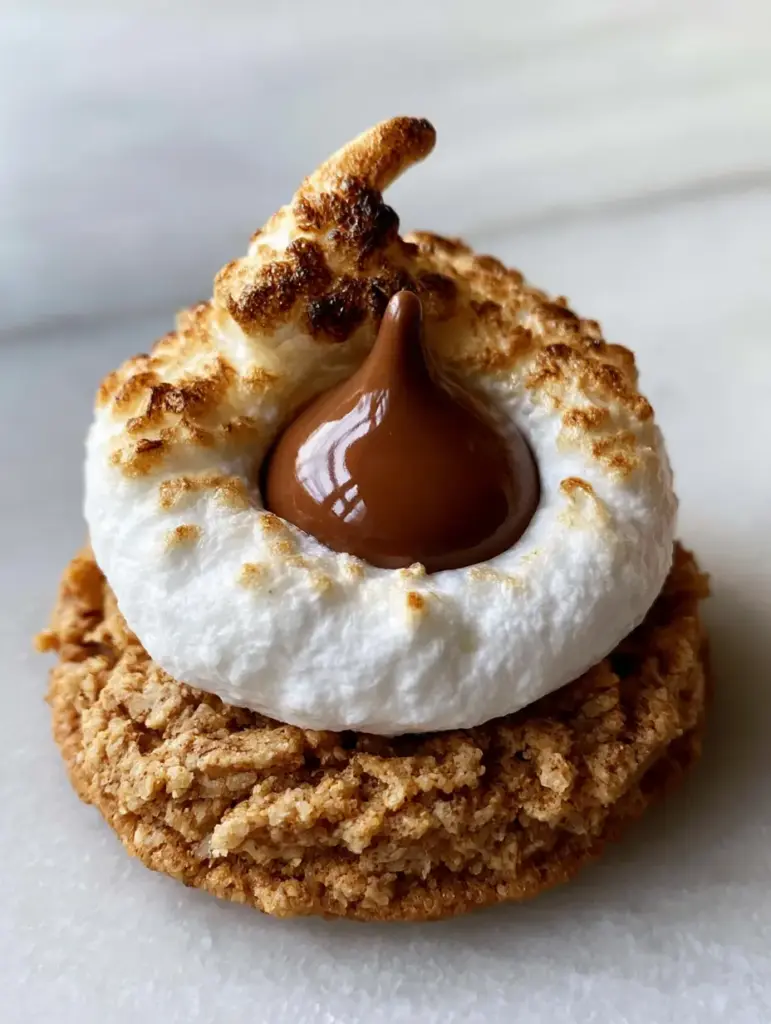
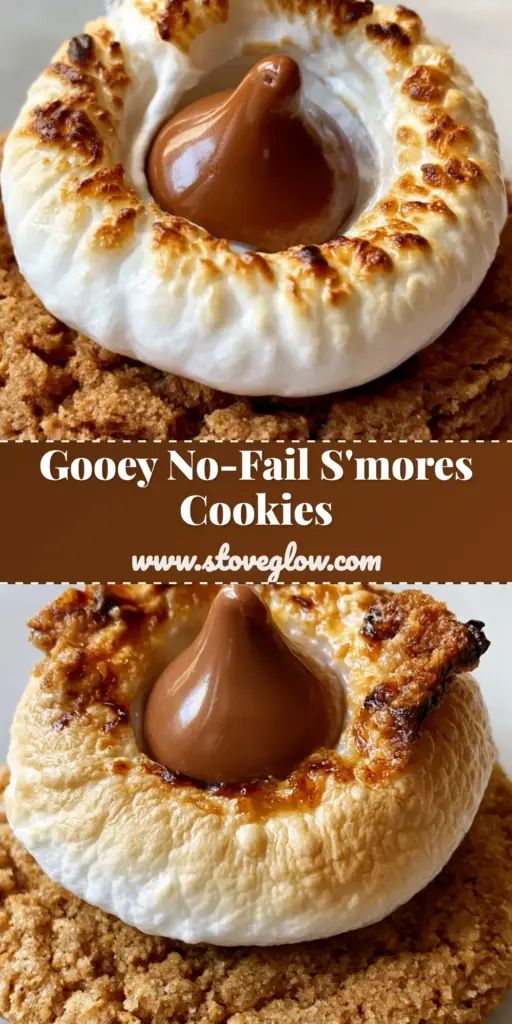
Imagine a thick, soft-baked graham cracker cookie base with visible textured crumbs and golden edges. It serves as the foundation for a perfectly puffed, toasted marshmallow featuring a caramelized, golden-brown charred crown. In the center of the warm marshmallow rests a glossy, slightly melting milk chocolate Kiss that ties the entire experience together.
Whether you are looking for a show-stopping bake-sale entry or a cozy weekend project, these cookies deliver professional results with a rustic, “unedited” charm. Let’s dive into how we achieve that perfect textural contrast of crunchy graham cracker and gooey, toasted marshmallow.
The Anatomy of a Perfect S’mores Blossom Cookie
To recreate the exact visual appeal of a professional culinary photo, we focus on three distinct layers that must work in harmony. The base isn’t just a standard sugar cookie; it is a scientifically balanced graham cracker dough designed to stay soft while providing that signature gritty crunch.
- The Foundation: A dense, soft-baked base infused with honey and finely ground graham cracker crumbs for a “sandy” but moist texture.
- The Crown: A large, puffed marshmallow that has been toasted under high heat to achieve a brittle, charred exterior and a liquid interior.
- The Core: A classic milk chocolate Kiss, pressed into the marshmallow while hot to ensure it begins to slump and glisten without losing its iconic shape.
- The Finishing Touch: An extra sprinkle of graham cracker dust to highlight the textured crumbs mentioned in our visual blueprint.
Essential Ingredients for the Golden Graham Cracker Base
Every ingredient in this list serves a structural or visual purpose to ensure your s’mores blossom cookies look exactly like the “handheld smartphone photo” we are aiming for.
All-Purpose Flour: 1 ½ cups (188g). This provides the structural protein needed to hold the weight of the marshmallow and chocolate without collapsing.
Graham Cracker Crumbs: 1 cup (120g). We use a mix of finely ground crumbs for the dough and coarser pieces for rolling to create that visible textured crumb look.
Unsalted Butter: ½ cup (113g), softened. High-quality butter ensures those golden edges develop properly during the Maillard reaction in the oven.
Light Brown Sugar: ¾ cup (150g). The molasses in brown sugar keeps the cookie “soft-baked” and adds a hint of caramel flavor that mirrors the toasted marshmallow.
Large Egg: 1 unit (50g). This acts as the emulsifier, binding the fats and flours to prevent the cookie from becoming too crumbly.
Large Marshmallows: 12 units, halved. We cut these in half to provide a stable “nesting” platform for the chocolate Kiss.
Milk Chocolate Kisses: 24 units. These must be unwrapped and ready to go the moment the cookies exit the broiler for that glossy, melting finish.
Foundational Additions: 1 tsp (5ml) vanilla extract, ½ tsp (3g) baking soda, and ¼ tsp (1.5g) fine sea salt to balance the intense sweetness.
Professional Equipment for Toasted Perfection
To achieve the “perfectly puffed” marshmallow with “golden charred edges,” you need the right tools to manage high-heat transitions.
A heavy-duty baking sheet is essential to prevent the bottoms of the cookies from burning before the edges turn golden. You will also need a cooling rack to allow air circulation, preventing the “soft-baked” bottom from becoming soggy as the marshmallow cools.
Finally, a kitchen torch is optional but recommended if your oven broiler is uneven. This allows you to surgically apply that “caramelized, golden-brown charred crown” to the very top of each marshmallow.
Step-By-Step: Mastering the s’mores blossom cookies
Step 1: Preparing the Graham Cracker Dough
In a medium bowl, whisk together your flour, graham cracker crumbs, baking soda, and salt. In a separate large bowl, cream the softened butter and brown sugar until light and fluffy, usually about 2-3 minutes of vigorous mixing.
Add the egg and vanilla extract, beating until fully incorporated. Gradually fold in the dry ingredients until a thick, sandy dough forms—this dough should hold its shape when pressed between your fingers.
Step 2: Shaping and the Initial Bake
Scoop about 1.5 tbsp (approx 30g) of dough and roll into a smooth ball. Roll the ball in additional graham cracker crumbs to ensure the exterior has that “visible textured” look once baked.
Place the balls on a lined baking sheet and bake at 350°F (175°C) for 8-10 minutes. Look for the “golden edges” to just begin to set; the center should still look slightly underdone and soft.
Step 3: Toasting the Marshmallow Crown
Remove the tray and immediately place a halved marshmallow (cut side down) onto the center of each cookie. Switch your oven to the broiler setting (high) and return the tray to the top rack.
Watch closely for about 30-60 seconds. You are looking for the marshmallow to expand and develop that “perfectly puffed” look with “golden-brown charred” spots. Do not walk away; sugar burns in an instant!
Step 4: The Chocolate Kiss Integration
Once the marshmallows are toasted, remove the tray. Immediately press a milk chocolate Kiss into the center of each puffed marshmallow. The heat will cause the chocolate to become “glossy and slightly melting,” exactly like our visual prompt.
Let the cookies rest on the pan for 5 minutes to allow the structure to firm up before transferring them to a wire rack to cool completely.
Expert Tips for Visual and Flavor Success
- Temperature Control: Ensure your butter is “room temp” (65°F/18°C), not melted. Melted butter will cause the cookies to spread too thin, losing the “thick, soft-baked” look.
- The Broiler Secret: If your broiler is too intense, keep the oven door slightly ajar so you can see the exact moment the marshmallow crowns char.
- Crumb Texture: For the most “photogenic” results, use a food processor for the dough crumbs, but crush the rolling crumbs by hand in a plastic bag for varied sizes.
- Chocolate Stability: If you plan on transporting these, pop them in the fridge for 10 minutes after the chocolate is added to “set” the gloss so they don’t smear.
Creative Pairings and Serving Suggestions
These s’mores blossom cookies are a rich, decadent dessert that pairs beautifully with other summer-themed treats. If you are hosting a backyard BBQ, consider serving these alongside a refreshing peach feta salad to cut through the sweetness of the chocolate.
For a complete dessert table spread, these cookies look stunning next to vibrant mango strawberry sunset cupcakes or even a chilled mango bingsu for a temperature contrast.
If you love the flavor profile of s’mores but want something even more chocolate-heavy, check out our recipe for s’mores chocolate chip cookies, which incorporates the graham crackers directly into a darker cocoa base.
Storage and Reheating Advice
To maintain that “soft-baked” texture, store your s’mores blossom cookies in an airtight container at room temperature for up to 4 days. Avoid stacking them directly on top of each other, as the marshmallow and melting chocolate Kiss can be quite sticky.
If the marshmallow loses its “gooey” texture, simply pop a cookie in the microwave for 5-8 seconds. This will revitalize the chocolate and soften the marshmallow without overcooking the cookie base.
Frequently Asked Questions
Yes, you can bake the cookie bases up to 2 days in advance. However, for the best visual ‘melting’ chocolate and ‘puffed’ marshmallow, toast the tops just before serving.
Absolutely! While milk chocolate is traditional for s’mores, dark chocolate Kisses or even a small square of high-quality dark chocolate will work beautifully.
You can use a handheld kitchen torch to surgically char the edges of the marshmallow once it has softened in the oven. This gives you more control over the golden-brown color.
For the dough, use a food processor to get fine, sandy crumbs. For the exterior coating, crush them in a bag with a rolling pin to get larger, textured chunks.
This usually happens if the marshmallows are broiled for too long or if they aren’t fresh. Ensure you use large marshmallows cut in half and watch them every second under the broiler.
The Ultimate s’mores blossom cookies Recipe
s'mores blossom cookies: The Ultimate Soft-Baked Graham Cracker Treat
Ingredients
Equipment
Method
- In a large bowl, cream softened butter and brown sugar until light and fluffy.
- Add egg and vanilla. Gradually mix in flour, 3/4 cup graham crumbs, baking soda, and salt until a dough forms.
- Roll dough into 1-inch balls, roll in remaining graham crumbs, and bake at 350°F (175°C) for 8 minutes.
- Place half a marshmallow on each cookie. Broil for 30-60 seconds until golden-brown and charred.
- Remove from oven and immediately press a chocolate Kiss into the center of each warm marshmallow.
Notes
Use room temperature eggs and butter for the best cookie texture.
Join the Community and Share Your Bake!
We hope these s’mores blossom cookies bring a bit of campfire joy to your kitchen! The combination of the charred marshmallow crown and the glossy chocolate center is a guaranteed crowd-pleaser. If you make these, we would love to see your results!
Tag us on social media or leave a comment below with your favorite s’mores memories. For more visual inspiration and daily recipe updates, be sure to follow KellyTaste on Pinterest and save this recipe to your “Baking” board!